Showing posts with label Spring. Show all posts

Friday, May 7, 2010

The Garden Begins

Does a grassy mulchy patch make your heart go pitter patter? Under that grassy mulchy spot sits a bunch of squash seeds....waiting to peek their little faces into the sun. These were planted yesterday....I'm cheating. Cheating our last frost free date.
Oh well....they're safe down in the soil.
And yes, those are all dandelion puffies in the background. It's my opinion that a dandelion never hurt anyone....at least it won't hurt you as much as pouring something on your lawn that a man has to wear a spacesuit to apply. Just this girl's opinion. ;-)

The green bean seeds are safely tucked into their grassy home as well.

And the ASPARAGUS!!! A Mother's Day gift from my folks. You can't see it yet, but it's down there....I'll show you when it peaks out.
Happy Gardening!!


Tuesday, April 27, 2010

The View From Here Today


The sun was so sunny today! Does that make sense? So bright the greens were so green and the blues were so blue. Beautiful. I'm seriously LOVING the flag hanging from our porch now. It was definitely worth the $1 investment . I take it out in the morning, take it down in the evening. It's nice to have porch duty again.....we missed you summer.

Tuesday, April 20, 2010

The Little Birdies Have Landed

Welcome home little birdies! Do you remember a few days ago I mentioned I was super lucky enough to win these little guys from Michael's giveaway over at Inspired by Charm?
Today was the big day of their arrival!! And let me tell you, they arrived IN.STYLE. I totally should have taken a photo of the box and packaging...it was so pretty! If I hadn't torn into it like a wild dog at the meat market I could have shown you. Beautiful handwritten label, note, GORGEOUS baker's twine wrapping the birds into their pink tissue blankets.

I think the birdies like their new home.
And as if I wasn't feeling like the luckiest girl on earth already.....Michael was kind enough to include this box of Goblin Chocolates as a little extra.
Combine two little boys, a surprise box of THE.MOST.DELICIOUS.CHOCOLATE.EVER, and a mommy trying to take photos of said chocolate.....not a pretty scene people. They were VERY happy when the chocolates' photo shoot was over and they could dive in. Thanks Michael!!


The boys were so sweet with our new porch friends.....our oldest told our youngest to "be very careful with the birdies. Mommy loves them and she would be sad if they broke." He's so kind.


Aren't they just the cutest thing ever?


Welcome Summer!!

Sunday, April 18, 2010

Monogram Window Tutorial

Please ignore the GIANT reflection in this photo...it was just that time of day.
I've had some REALLY nice comments about the monogrammed window on my springtime mantel. SO....I thought I'd share a quick little tutorial! This is a really quick, really easy project for big impact. I like that....easy and big. ;-)

First find a design you really love...it can be ANYTHING. I use Microsoft Publisher to do everything, so I copied the image I found into Publisher, sized it to my window, inversed the image (this is important), then printed it out. Here's a little tip....you don't need to print it out in black, just do it in light gray. SAVES INK!!! Did you know printer ink is the single most expensive fluid on earth? My husband told me that, so I'll just take it as fact.


When you have your pages lined up, tape them all together and trim the whole show to fit inside your window frame.


Find a really dirty, really old FREE window.


The dirtier the better.
Be sure to clean clean clean your dirty dirty window.
Windex the heck out of this puppy.


This is the only part that might be confusing. When your window is nice and clean tape the image onto the side of window that you want to see as your final result. My window was stained wood on the good side, painted wood on the other. I wanted the stained side to show, so I taped my image to that side, so that I could see the inversed image through the window.

When your image is placed the way you want it, paint away! I used Folk Art acrylic craft paint in a nice turquoise color. Don't get too caught up in making everything perfect. Focus on nice brush strokes and clean lines.

It's best to paint on the back side of the window because the finished result is a nice smooth image through the glass. You can paint on the front of the glass if you prefer, but I like the smooth look behind the glass.


Paint over your image a few times to get a nice opaque coverage.
Remove the paper from the window. Flip over your window.

There you have it, a pretty (easy) monogrammed window!


Linking to:
Metamorphosis Monday at Between Naps on the Porch

Thrifty Treasures at Southern Hospitality

It's So Very Creative at It's So Very Cheri

Trash to Treasure Tuesday at Reinvented

Saturday, April 17, 2010

Wiggle Tree Mystery SOLVED!

Once upon a time (last summer), a tall wiggly twig grew and grew....straight up from our backdoor flower bed. Usually these poor little saplings get trimmed right off....but this one was different. It made us laugh because it would quiver in the wind. If you were 100 times taller than you were around you would quiver in the wind too. ;-) Thus, the puny little tree was named the wiggle tree....and we watched and watched as it got taller and taller all summer. Then came winter. We forgot about the wiggle tree.


This spring the wiggle tree was back in all its glory, sprouting leaves to and fro. In fact, so many leaves, I took a photo to blog about....and ask for help identifying our wiggle tree.


But then....a miracle.....our scrawny, pathetic little wiggle tree......became a butterfly.

Otherwise known as a beautiful, flowering, blooming crab apple tree.


I would now like to invite whatever bird whom pooped this beautiful tree into my flower bed to return often. Poop away dear bird, poop away.

Thursday, April 8, 2010

Hanging on the Line


Sunshine + Wind = The most wonderful sheets you've ever slept on.
YAY SPRING!

Wednesday, March 31, 2010

We're Ready


The plans have been made....the seeds are started (tomatoes and peppers that is)....now we just wait. As my Grandma Eula would say, wait until you can go in the garden with your bare feet and feel comfortable on the soil.....then it's time to plant.

I enjoy mapping out my planting in the garden...I rotate each year from raised bed to raised bed. Farmers do it, so I figure I should too. Can I count myself as a farmer? I think I will.


Last year my dill and cukes made friendly early on....what perfect friends. I hope they're friends again this year. The dill pickle supply has run dry at the VanOort homestead. ;-)

UPDATE:
I'm such a tease....didn't even tell you what I'm planting this year.
Thanks for reminding me Robin! :-)
In addition to the scallions, chives, garlic chives, rhubarb, raspberries, blackberries, blueberries and strawberries already growing in the garden....I'll be planting:
Sweet Baby Girl tomatoes
Gurney Girl tomatoes
Sonora Hot peppers
Chile Sahuaros
Sweet Peppers
Snow Peas
Bush Beans
Dill
Zucchini
Parsley
Beets
Winter Squash
Italian Basil
Spinach
Cucumbers
Carrots
Coriander
Garlic

Sunday, March 28, 2010

Paper Easter Lily Tutorial

I'm going to do it. I'm just going to do it. Try my hand at a tutorial that is. NOW, I will forewarn, if you end up making a felt parakeet or a tin can sombrero I cannot be held liable...I've never done a tutorial and I just might stink at it. ;-)

This is a super cute project for your kiddos for Easter. Paper Easter Lilies!! And they really do actually look like a lily when finished! I saw this project over here but I will admit I remember VERY LITTLE Spanish from high school (wish I did). SO, I sort of winged it. I didn't take the time to Google Translate, forgive me.


The supply list is pretty short...white copier paper, green paper, green cardstock, tape and a little yellow paper.

Roll up the green paper, long side, around a skewer...or whatever long skinny round thing you can dig up. This takes a little patience. Trust me.

When your paper is rolled, tape it three times to keep it from unrolling. Remove the skewer.

Fold the cardstock in half long ways.

Cut shapes resembling leaves. Be sure to leave a little space at the bottom (fold side), as this is where your stem will eventually slide through.

Notch the folded end of the leaf.

Trace and cut around your great big grown up hand, or around your cute little kiddo hand.

Now you have notched leaves, a big white hand, a rolled stem and a little yellow stamen.

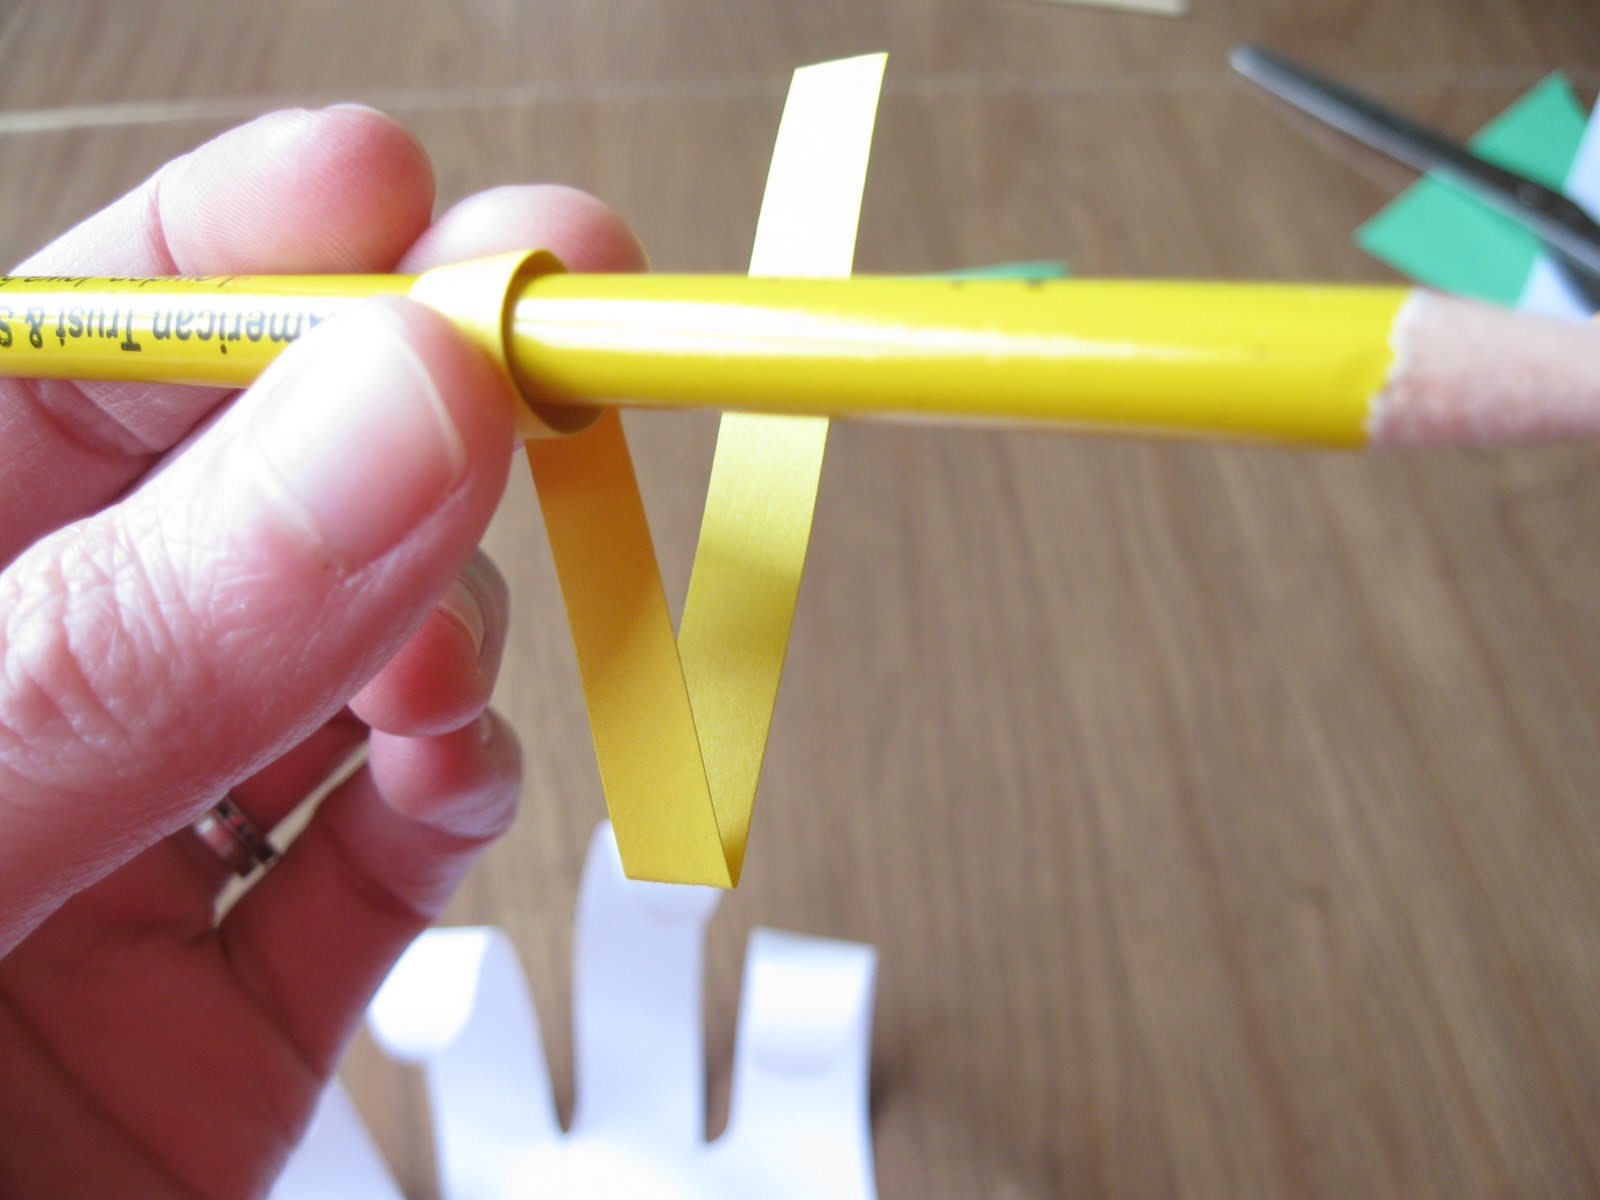
Roll each of your fingers around a pencil, just so.

Fold your stamen in half, roll one side.

Roll your leaves a bit as well.

Slide your leaves, curls down, onto the stem.

Tape the stamen to the stem. PLEASE do this step BEFORE the flower part...
trust me on this one too.

Now gently roll your hand, curly fingers pointing down around the stem and tape!

Thursday, March 25, 2010

Springtime Mantel

I've been SLOWLY transitioning the mantel from Valentine's Day to Spring/Easter....it took a while...and a very messy, very full mantel. When I took away the Valentine's completely it looked pretty empty....but it felt better. Kind of like when all the Christmas decorations come down...as much as I love them, it feels refreshing to have the house pared down.

Miss Cottontail hopped home with me from Goodwill this weekend. Really, how could I not? She was only $.38....and I have NO other rabbits, AT ALL. (see honey, I NEEDED this rabbit;-)


Come to think of it....everything on this mantel was either thrifted, free or created here on the VanOort homestead. Do you remember the "thankful" sign from here? And the mantel scarf from here? And the eggs? And the nests? The candles were another super duper find from the weekend....a WHOLE BOX of 12!

I'm thinking after Easter I'll replace the eggs with shells and the bunny with....hmmm.....well I don't know yet....but I'm really liking the sparseness of the whole show right now.

This is kind of an ick photo (oh brother, is my mantel scarf SERIOUSLY that crooked?)....but I thought it was really funny because you can see my feet in the mirror....and two little sets of feet next to me begging...."LET ME SEE THE PICTURE. LET ME SEE THE PICTURE. LET ME SEE THE PICTURE."

Happy Springtime!
♥♥♥♥♥♥♥

Linked up to:

Get Your Craft On at Life as Lori

Transformation Thursday at The Shabby Chic Cottage

Wednesday, March 24, 2010

Back From the Beyond


Spring has officially arrived at the VanOort homestead. Spring projects are all I can think of.


Um, hello? 9-1-1? I'd like to report a Mommy who crafts endlessly.


Our latest challenge came after our heaven sent trip to the Goodwill last weekend. Here she is....poor dated thing. You don't want to look this way anymore, I know. There there.

Oh goodness, how did you let your top get so rusty? Oh, they set plants on you...without a saucer....ahh, that stinks. It's a good thing I found you there, all lonely and super cheap, at the Goodwill. $2.38...yes, we can be friends.


Like I mentioned (maybe a gazillion times in this blog already) I REEEEALLY love the ReStore. I'm sure there's one near you...go ahead and Google, I'll wait.


Okay, that's enough waiting. On my last trip in, I checked out the spray paint aisle....SCORE! These four called out to me....first there was the frosted glass (nearly full)...I can see lots of potential there! Then a full can of gray primer...I mean really, WHO doesn't NEED gray primer? Enough said. THEN, the gray hammered metal (awesome...I used this to cover the poor rust covered top of my little beauty.) THEN I found this beautiful shade of springy yellow. Ah, I love you ReStore, let me count the ways.

HURRAY! This is my little beauty after a coat of creamy white (this can was already hiding in the basement for me.)

I took a little of this wirey stuff....it was FREE last summer at a garage sale. Do you ever feel weird taking the free stuff? I do. But I took it anyway....and ran back to the car.

I then squirted the wirey stuff with my pretty yellow paint because I just couldn't get behind the pink and purple scheme....it's just me....I'm sure it would have looked fine.


Add this GORGIE GORGEOUS TALLLLL white faux bois candle from the Goodwill, a few of the eggs I can't seem to stop making, and voila! A fun spring craft for the whopping price of $5.76.


I can TOTALLY picture this thingy with a big black candle at Halloween....or dressed all pretty for Christmas...or with a pumpkin on top with fall leaves....don't you just love versatile projects?
Linking up to:
Related Posts with Thumbnails